PetroVR 2020 Installation Guide
How to obtain the PetroVR Installer and licenses
Register on our website to download the PetroVR software
In order to start using PetroVR it is necessary to access the Client Portal on our website https://clients.aucerna.com/ using the Login or Register options.
After completing the registration and having logged on to our website, access the PetroVR download page, where you can obtain the PetroVR software (PetroVR installer, license tools), the User Manual and the Installation Guide. Make sure you have received a license file (*.lic) from Aucerna.
If you have a legacy PetroVR version that uses a Flex license instead of the new Aucerna one, you should have the zipped file “GetID.zip” (for stand-alone licenses) and “FlexLM_Server_11.5.zip” (for network licenses.)
Request a license file
Unless you or your company already have a PetroVR license file, you will need to request one. It is provided by the Aucerna Support Team and must be requested via the Help Desk Portal. See more details in How to contact us.
From PetroVR v2020 on, the new Aucerna license scheme is the preferred licensing method. For existing and legacy users (with version previous to 14.1), Flex stand-alone and network licenses are will be supported until 2021. In sum, there are three types of licenses:
- Aucerna LM license, sharable among multiple users connected to your network. No server installation is required since Aucerna provides the service.
- Stand-alone FlexLM license, locked to a specific computer.
- Network FlexLM license, sharable among multiple users connected to your network.
How to contact us
If you have any questions during the installation, please contact us via a ticket on our Support portal to ensure a quick response. The Support portal is automatically enabled after registering in aucerna.com.
If you do not have an aucerna.com account, go to https://clients.aucerna.com/ and click Register.
You should complete your personal information and submit it. We will send you an email with a verification link to confirm the registration. (In this way we guarantee the privacy of all our clients.) Once your registration is confirmed and your account is associated to your company (this process could take 1 day at most) you will be able to access our Help Desk from the Support (light orange) section > Help Desk link and to select your Company in the Products field when creating requests.
If you have any problem during the registration you can send us an email at: petrovrsupport@aucerna.com.
How to get a license file
Our Support team is in charge of building and delivering licenses. In case you need a license file, a request must be submitted to our Support team.
If you have a legacy Flex license, the Support team will require:
- MAC address
- Server Name or IP address (only for network licenses)
Network licenses use a Flex license manager installed in a Server. So, the MAC address submitted must correspond to that server.
For standalone licenses, you will need to provide the MAC address for the computer where PetroVR will be used.
You can obtain the MAC address by using the tools lmhostid.exe and getID.cmd provided in GetID.zip or included in FlexLM_server_11.5.zip that can be downloaded from our website, as explained in How to obtain the PetroVR Installer and licenses.
Steps to Obtain the MAC Address
To obtain the MAC address
- Save both files (lmhostid.exe and getID.cmd) in the same folder in the computer where PetroVR will be used or in the Server.
- Double click on getID.cmd.
- Send the HostID numbers shown in the command line to our Help Desk.
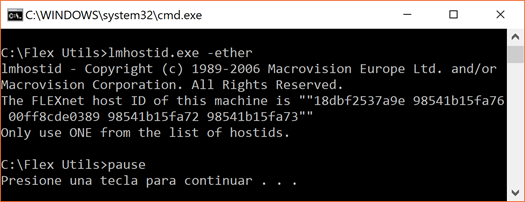
Click image to expand or minimize.
License file installation
Aucerna license
Once the license is obtained from the Help Desk, copy it to a directory on the machine where you will run the installer.
Standalone license
Once the license is obtained from the Help Desk, copy it to a directory on the local computer where PetroVR will be used.
FlexLM Network license
Once the license is obtained, copy it to a directory on the server where the license server resides. Please refer to Network License Server installation for a detailed description.
General issues
Installing, re-installing, upgrading and uninstalling
Some considerations for a new installation, re-installing, upgrading and uninstalling are listed below:
- Permissions:
- You must be logged on to the computer as an “Administrator” and have full control (read/write/overwrite access) over the selected installation folders.
- Windows task - process:
- Close any open MS Excel or PetroVR sessions prior to installing PetroVR.
- New and existing projects:
- PetroVR projects created with previous versions of PetroVR are preserved after installing a new PetroVR version.
- PetroVR is provided with a Model Library. The library files are overwritten when re-installing or upgrading PetroVR and deleted during uninstallation.
- An empty folder named “PetroVR Projects” and a shortcut to the PetroVR Model Library are automatically created in your Documents folder during a fresh installation. They are preserved after uninstalling, re-installing or upgrading PetroVR.
- Configuration:
- Configuration files (.bnd, .log, .ini, etc.) are preserved during an uninstall or upgrade.
Upgrading PetroVR from version 2017 to 2018 or later, a special case
From PetroVR 2018 on the paths of installation folders were changed from Caesar Systems to Palantir, and after PetrVR 2019, from Palantir to Aucerna. This includes folders in %ProgramFiles(x86)%, %ProgramData% and %AppData% (these are Windows environment variables that depend on the Windows version).
So if you have PetroVR 2017 or any previous version of PetroVR installed it is advisable to uninstall the previous version and install the current version.
If you decide to upgrade it, PetroVR will try to rename the folders from Caesar Systems or Palantir to Aucerna (see Installation folders and Permissions for PetroVR user).
If this is not possible (because they are in use during the process) a new Aucerna folder will be created and the old Caesar Systems or Palantir folder will be preserved without changes. You can delete it after successful installation of the new version.
Bear in mind that you should configure your permits for the new path to do a successful installation.
System Requirements
| Memory usage | 8+ GB of RAM |
|---|---|
| Hard disk | Solid-state drive (SSD) for optimal performance when running Monte Carlo or browsing stochastic results |
| Display | Color: 32 bits per pixel |
| CPU | Multi-Core 800 MB/per core (apart from memory usage above) |
| Operating System | Windows Vista or later (32-bit and 64-bit versions supported) |
| Other |
|
Installation Folders and Permissions for PetroVR users
PetroVR will be installed by default in: %ProgramFiles(x86)%\Aucerna\PetroVR (%ProgramFiles(x86)%, %ProgramData% and %AppData% are Windows environment variables and depend on the Windows version). You can change this path during the installation process.
Also, a folder %ProgramData%\Aucerna\PetroVR will be created with configuration files. You must have read and write access to this folder and its subfolders.
One of the folders created in this path is “Updates”. You can change the path to the Updates folder later from within PetroVR, but in any case PetroVR will require write access to the chosen location (see Location of PetroVR updates Dialog).
When you start PetroVR for the first time a folder %AppData%\Aucerna\PetroVR is created. PetroVR user configuration files will be copied there and will be updated with user settings, so you should have write permissions to that folder.
PetroVR is provided with a Model Library. The Model Library is located in %ProgramData%\Aucerna\PetroVR.
Finally, a PetroVR Projects folder is created under your Documents directory with a shortcut to the PetroVR Model Library. It is used by default to open and save PetroVR projects.
The following table summarizes the directories that PetroVR uses and the permissions users of the application need to have.
| Directory | Known Windows Folder Name | Default PetroVR Folder | Permissions |
|---|---|---|---|
| Application Directory | Program Files (x86) | %ProgramFiles(x86)%\Aucerna\PetroVR | Read, Execution |
| Application Data Directory | ProgramData | %ProgramData%\Aucerna\PetroVR | Read, Write |
| User Data Directory | Documents | %UserProfile%\Documents\PetroVR Projects | Read, Write |
| User Application Data Directory | AppData/Roaming | %AppData%\Aucerna\PetroVR | Read, Write |
Installation guidelines
PetroVR can be installed using the Wizard or the Unattended mode. The same options can be configured in both modes. The Wizard mode is generally used when individual users install the software on their computer. The Unattended mode is generally used by IT network administrators.
For both modes:
- The same installation file is used. You can download it from our website aucerna.com, as explained in PetroVR Installation Overview.
- Prior to installation you need to know:
- License type to use: Aucerna, Flex stand-alone or Flex server.
- Location of license file: absolute Windows path (for Aucerna or Flex stand-alone license types) or port and server name (for Flex server license type).
Wizard Installation Mode
To start the installation, double-click the PetroVR Installation (.exe) file you downloaded from the Aucerna web site, as described in How to obtain the PetroVR Installer and licenses.
License Type Selection Dialog
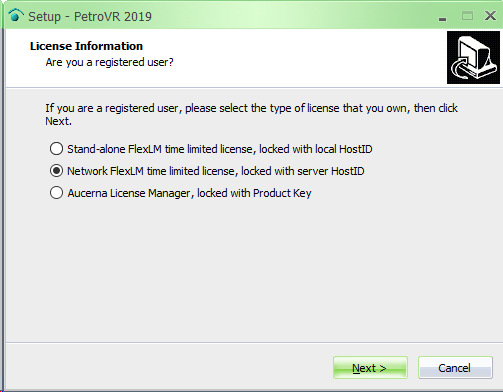
Click image to expand or minimize.
Select the location of your Stand-alone (.lic) file. Then click Next.
License Location Dialogs
Stand-alone license selected
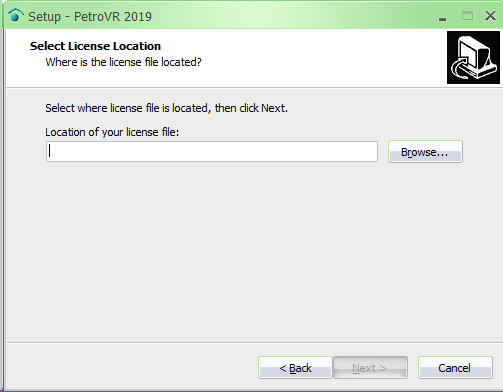
Click image to expand or minimize.
Select the location of your Stand-alone (.lic) file. Then click on Next.
Network license selected
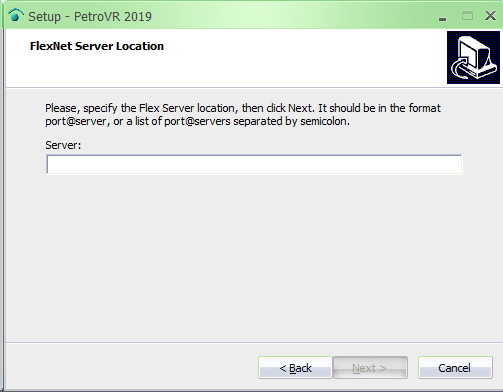
Click image to expand or minimize.
Complete with the server name where the license server is running. Use the format
port@server
or (if you are using the default port 27000)
@server
Then click Next.
Aucerna license selected
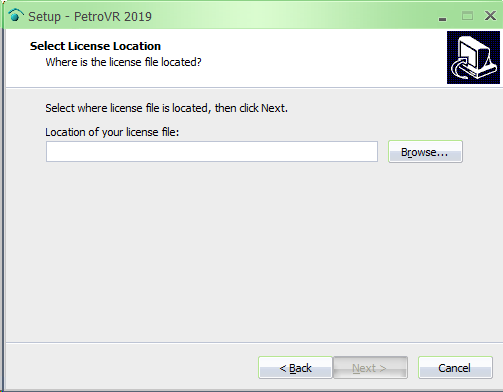
Click image to expand or minimize.
Select the location of your Aucerna license (.lic) file. Then click Next.
Update Pack Dialogs
Update Packs installation Dialog
During the installation, you can decide whether the Update Packs will be installed in a centralized way or if each user will manage them separately.
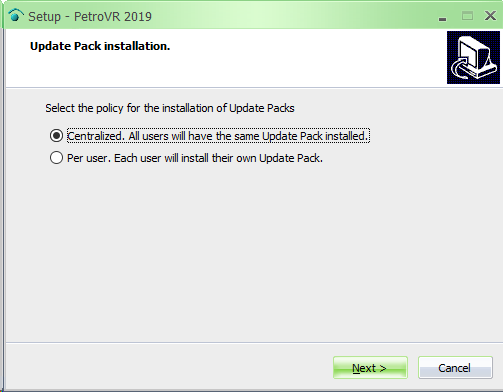
Click image to expand or minimize.
If Centralized is chosen, the PetroVR.ini file created by the installer will have the key centralized = true under the [Updates] section (the installer creates the PetroVR.ini file in the folder %ProgramData%\Aucerna\PetroVR).
When a user starts PetroVR after this installation, this setting will be copied to the user's .ini file. When you start PetroVR after this installation, the installer .ini is used to create or update the user’s .ini located in %RoamingAppData%\Aucerna\PetroVR. Each PetroVR user has their own .ini.
When the admin user installs an Update Pack, the centralized=true setting in their particular .ini will force PetroVR to write the upk info in the installation .ini (rather than in the admin's .ini).
When subsequently a user starts PetroVR, the centralized=true setting will force PetroVR to read the upk info from the installation .ini.
If the Per user option is selected, the PetroVR.ini file created by the installer will have the key centralized=false.
When a user starts PetroVR after this installation, this setting will be copied to the user’s PetroVR.ini file.
When subsequently a PetroVR user installs an upk, the centralized=false setting in their particular .ini will force PetroVR to write the upk info in the their own .ini.
Bear in mind that the setting centralized can be changed after PetroVR is installed. For instance, if the Centralized option is selected during installation, but then a PetroVR user needs to install a specific update pack, this user can do this by changing the setting to centralized=false in their own .ini. This change will only impact the installation of update packs for this user.
Location of PetroVR updates Dialog
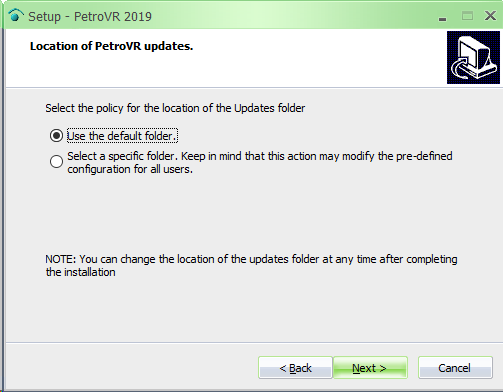
Click image to expand or minimize.
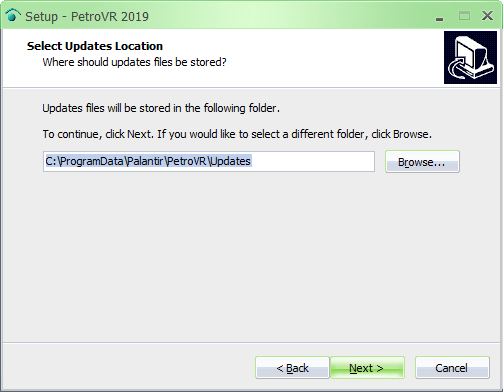
Click image to expand or minimize.
Select the default or an alternative appropriate location. Then click Next.
When the Centralized option is selected, the Updates installation folder is by default placed in %ProgramData%\Palantir\PetroVR. The admin user must have full control (read/write/overwrite access) over this folder to install and manage updates. Other PetroVR users must have read access to this folder.
In case the default folder does not have these rights, the installer lets you choose another specific location. This location is written in the setting updatesDirectory of the installer .ini and is not copied to the user’s .ini.
Also, this setting can be changed after installation, editing the installer .ini.
When the Per user option is selected, the Updates installation folder is by default placed in the user's application data folder, which is usually %RoamingAppData%\Aucerna\PetroVR.
In this case the default folder cannot be changed during the installation, but users can always change the Updates folder after PetroVR is installed from the application. In this case, the updatesDirectory setting is updated only in the user’s .ini.
In PetroVR the installation of update packs will always be centralized if:
- the setting centralized is true in the user's .ini
- the setting centralized is true in the installer .ini
- the updatesDirectory defined in the user’s .ini is not defined or is the same as the one defined in the installer .ini.
Installation Location Dialog
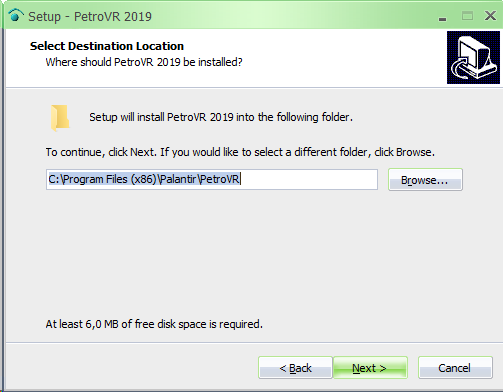
Click image to expand or minimize.
Select the path where PetroVR will be installed. Then click on Next.
Installation from the Command Line
PetroVR can be installed directly from the command line.
This installation mode is suitable for
- Unattended installations
- Installations that require a configuration file
Unattended Installation Mode
You can use any of these two silent modes:
- Silent: You will see the installation progress bar.
- Very Silent: No window will be shown.
To avoid warnings during installation you must ensure that:
- MS Excel is closed.
- You have Administrator rights.
- You have full control (read/write/overwrite access) over the installation directories.
- The setup.inf file is created (see Using the Configuration file)
The command line formats for these modes are as follows:
>PVR_14.104.exe /silent
or
>PVR_14.104.exe /verysilent
where PVR_14.104.exe is the installer (the name changes with the build number).
Using the Configuration file
You can install PetroVR from the command line passing a configuration file as parameter.
The format for the command line to use a configuration file is as follows:
>PVR_14.104.exe /loadinf=setup.inf
where PVR_14.104.exe is the installer and setup.inf is the configuration file. Note that in this example PVR_14.104.exe and setup.inf are both in the current folder. If this is not the case, you must use absolute paths.
Refer to Inno Setup documentation for more installation options (http://www.jrsoftware.org/ishelp/index.php?topic=setupcmdline)
The setup.inf file allows you to define the information needed for installing PetroVR and values of the configuration file of the application named PetroVR.ini.
When installing using any of the unattended modes described above, a configuration file is generally used too. In this case the format of the command line is as follows:
>PVR_14.104.exe /silent /loadinf=setup.inf
Configuration file format
The setup.inf file has the standard INI file format.
Details of valid sections in the configuration file are given below.
Setup section
The PetroVR installer uses the directory %ProgramFiles(x86)%\Aucerna\PetroVR as the default installation directory.
If you do not use the default path, you can define as follows:
[Setup]
dir= <setup directory absolute path>
Sections for values of PetroVR.ini
In the configuration file you can define sections to set values of the .ini file of the application.
The valid sections to define these values are:
[Date Format]
[Default Directories and Files]
[Fonts]
[Globals]
[License]
[Palantir]
[PetroVR Agent]
[PetroVR Web Server]
[Portfolio Indicators]
[Start Up]
[Technical Switches]
[Updates]
In every section you can define values for any valid key in the related section of PetroVR.ini.
License sections
The supported license types are Flex and Aucerna.
The license type can be defined in the setup.inf as follows:
[License]
type= Flex | FlexNet | Aucerna
This section is required for unattended installation mode when installing PetroVR for the first time.
Defining Aucerna license
If the license type is Aucerna, the path of the license file is defined as follows:
[License]
licensePath= <license file absolute path>
Defining Flex license
When the license type is Flex, the path of the license file is defined as follows:
[License]
licensePath= <license file absolute path>
- <license file absolute path> used for stand-alone licenses defines the license path.
When the license type is FlexNet, the value is defined as follows:
[License]
licensePath= <port>@<server>
- <port>@<server> used for Network licenses, defines where the Flexera® FlexLM license manager is located.
- <port> can be empty if you use the default port 27000
- @ is mandatory in all cases.
- <server> is the name or the ip address of the server where the license manager is installed.
Updates section
The PetroVR installer sets as default the Per user policy for the installation of update packs.
If you wish to define the installation policy explicitly you can do it as follows:
[Updates]
centralized= true | false
- true used for the Centralized policy
- false used for the Per user policy
The PetroVR installer uses the directory
%ProgramData%\Aucerna\PetroVR\Updates
as the default directory for updates.
If you do not wish to use the default path you can define the path as follows (only with the Centralized policy):
[Default Directories and Files]
updatesDirectory= <Updates directory absolute path>
If you wish to use the default PetroVR Updates folder you can use the reserved word #default instead of <updates directory absolute path>.
Configuration file examples
Aucerna License example
[Setup]
dir=C:\ProgramFilesFolder\Aucerna\PetroVR
[Updates]
centralized=true
[Default Directories and Files]
updatesDirectory=C:\Users\John\Documents\PvrUpdates
[License]
type=Aucerna
licensePath=C:\Licenses\aucernaLicense.lic
Flex Standalone example
[Setup]
dir=C:\ProgramFilesFolder\Aucerna\PetroVR
[Updates]
centralized=true
[Default Directories and Files]
updatesDirectory=C:\Users\Mary\Documents\PetroUpdates
[License]
type=Flex
licensePath=C:\Licenses\flexLicense.lic
Flex Server example
[Setup]
Dir=C:\ProgramFilesFolder\Aucerna\PetroVR
[Updates]
centralized=true
[Default Directories and Files]
updatesDirectory=C:\Users\John\Documents\PvrUpdates
[License]
type=Flex
[Flex]
licensePath=@10.2.2.10
After installation considerations
Modify configuration of PetroVR Installation folders
After installing PetroVR you can modify the file paths to the associated files at any time. This configuration is done from the PetroVR menu item Tools > Options > Files & Directories where you will find the default paths set during installation and where you can double-click to edit. This configuration is defined for all PetroVR sessions in the current computer.
Upgrade and change of license type
When an upgrade is performed, the installer automatically detects the license type and the application folder. All the necessary files are updated.
The configuration files are updated accordingly.
The installer does not overwrite Model Library models that have been modified by the user; it only overwrites unmodified ones. If you wish to upgrade all demo projects, you must remove the model library folder manually prior to running the installer.
Upgrading the license type from the legacy FlexLM scheme to the new Aucerna one can be done in two ways:
If the old license is still valid, change it from the PetroVR interface: Tools>Options>License
If the old license expired or the PetroVR is older than v14.106, edit the PetroVR.ini file and change the licence type:
[License]
type=Aucerna
[Default Directories and Files]
aucernaLicenseFileName=Lic file complete path and name
OpenCL Drivers
PetroVR takes advantage of OpenCL processing to calculate Monte Carlo indicators in parallel. It is advisable after installing PetroVR to check that the latest OpenCL drivers are properly installed. For assistance on how to install OpenCL drivers see OpenCL Installation
Uninstall
When an uninstall is performed, the modified projects in the Model Library and all the .ini files are preserved; if a new version is installed later, the .ini files are renamed appending a .bak extension to their names.
Network License
The new Aucerna license scheme does not require mounting a server since Aucerna provides access to the company’s server.
The legacy license based on a FlexLM server is instead a dedicated server providing license information during PetroVR installation and PetroVR sessions. If you use the FlexLM server you need to install the FlexLM server before installing PetroVR. You can follow the steps described in FlexLM Network installation to do this.
Make sure the server where the FlexLM License Server is installed is reachable from your computer during installation of PetroVR.
During the installation you will be asked to provide the server name or IP address where the FlexLM server resides. A licServer.ini file is saved with this information.
Note: If you use a port number that is outside the range of the Flexera default ports [27000-27100], it should be:
- specified in licServer.ini after installing PetroVR (only for Wizard installation mode.)

or
- specified in the setup.inf file (only for Unattended installation mode.)

FlexLM Network installation
In order for the license manager to work you need three items:
A. A server license file
B. The Flex License Manager
C. The “caesar” daemon
You can get these from our PetroVR Downloads section on the web, as explained in How to obtain the PetroVR Installer and licenses.
If you do not have a FlexLM installed and running on a server
- Create a folder named: “Flex License”
- From the “FlexLM_server.zip” already downloaded, save the following files in this new folder:
- lmtools.exe
- lmgrd.exe
- caesar.exe (PetroVR vendor daemon)
- the server license (.lic) provided by Help Desk
- Start lmtools (double click on the file to open it)
- Go to Service/License File tab.
- Select the option: “Configuration using Services”.
- Go to the Config services tab. In the Service Name drop-down bar, type “Caesar”.
- Complete the path to:
- lmgrd.exe
- license file
- a new log file (for example: caesar.log).
- Enable “Use Services” and “Start Server at Power Up”.
- Click the “Save Service” button.
- Go to Start/Stop/Reread and click on Start Server.
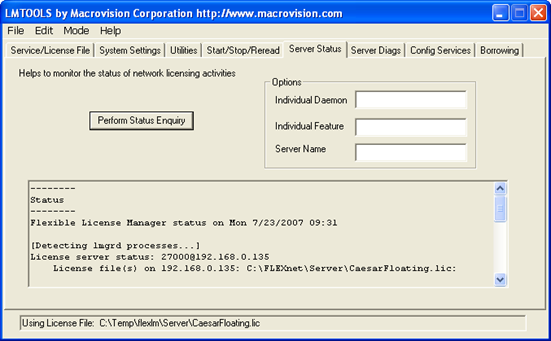
- To further check that the server is running, you can go to the “Server Status” tab in lmtools, and click the “Perform Status Enquiry” button. The text box below should include information about the Caesar daemon and the available licenses.
FlexLM Network installation
In order for the license manager to work you need three items:
A. A server license file
B. The Flex License Manager
C. The “caesar” daemon
You can get these from our PetroVR Downloads section on the web, as explained in 1.1. How to obtain the PetroVR Installer and licenses.
If you do not have a FlexLM installed and running on a server
- Create a folder named: “Flex License”
- From the “FlexLM_server.zip” already downloaded, save the following files in this new folder:
- lmtools.exe
- lmgrd.exe
- caesar.exe (PetroVR vendor daemon)
- the server license (.lic) provided by Help Desk
- Start lmtools (double click on the file to open it)
- Go to Service/License File tab.
- Select the option: “Configuration using Services”.
- Go to the Config services tab. In the Service Name drop-down bar, type “Caesar”.
- Complete the path to:
- lmgrd.exe
- license file
- a new log file (for example: caesar.log).
- Enable “Use Services” and “Start Server at Power Up”.
- Click the “Save Service” button.
- Go to Start/Stop/Reread and click on Start Server.
- To further check that the server is running, you can go to the “Server Status” tab in lmtools, and click the “Perform Status Enquiry” button. The text box below should include information about the Caesar daemon and the available licenses.
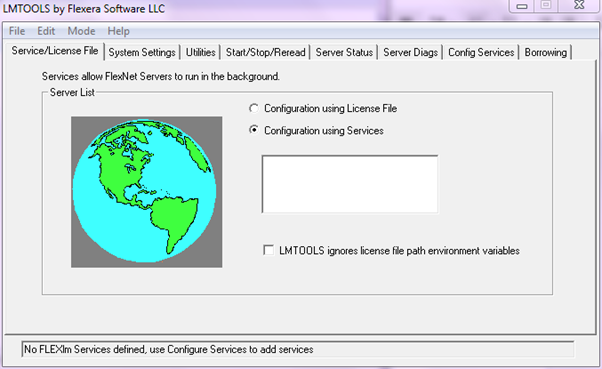
Click image to expand or minimize.
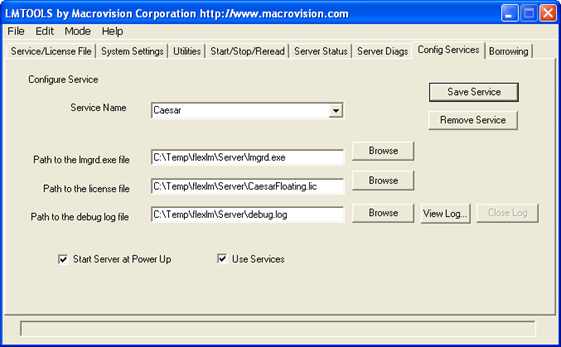
Click image to expand or minimize.
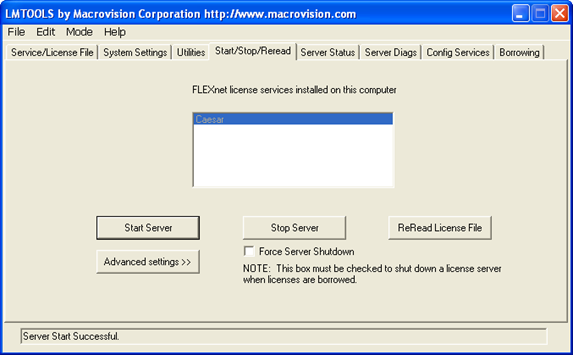
Click image to expand or minimize.
Click image to expand or minimize.
If you already have a FlexLM Server, but you never installed the Caesar service
To avoid potential problems, please first check that you are using an updated “lmgrd.exe” file.
- Right-click on the lmgrd.exe file.
- Select “Properties”.
- Go to the “Version” tab: check that the version number is 11.4.0.0 or later.
If you are using an older version we strongly recommend to upgrade it. You can use the lmgrd.exe file included in “FlexLM_server.zip”.
To install the license, follow the steps in If you do not have a FlexLM installed and running on a server.
If you already have a PetroVR license running on a FlexLM server
You will only need to refer to the new license and re-read it.
- Go to the Config service tab.
- Browse for the new license file and set it to point to the new one.
- Go to “Start/Stop/Re-read” and Re-read the license file.
Borrow licenses feature
Using a borrowed license means that you will be able to use PetroVR without connection to the license server.
It is possible to borrow licenses directly from the PetroVR GUI.If the license is of the Flex type, to enable this feature it is also necessary to install the new FlexLM server tool v11.5.0.0 available at the Demo section > Download PetroVR option in our website aucerna.com.
If the license is of the Flex type, to enable this feature it is also necessary to install the new FlexLM server tool v11.5.0.0 available in the Demo section > Download PetroVR option on aucerna.com.
